Tuesday, February 17, 2009

Tips menghitamkan rambut dengan photoshop

kadang warna rambut jadi jelek akibat tingkat penggunaan cahaya yang kurang bagus, apalagi kalau foto itu diambil dari kamera dengan mpx yang kecil. tapi tidak masalah, apa gunanya photoshop di ciptakan...hehehehehe


1. open file foto kamu di adobephotoshop tentunya
2. pilih Image > udjustments > selective colour
3. di kolom selective colour pilih warna hitam
4. black ditambah sesuai keinginan
5. di methodnya pilih relative

gampangkan...cuma butuh waktu 10 detik saja
####### selamat mencoba #####

Sunday, February 15, 2009

membuat foto anak kembar / create an image twin

create an image or two images in order to combine two apparently identical


1. open the two images to be combined
(Image size the two images is the resolution)
2. slide one image to another image with the (V)
3. selection of objects that are not needed / objects other than photos with polliganol lasso (L)
4. remove the (E)
5. if necessary, adjust the image with the Edit menu> transform> scale
6. blur border of the image first and second with the blur tool (L)

selamat mencoba

Wednesday, February 11, 2009

Foto ala design grafis


1. buka file foto di adobephotoshop
2. pilih menu filter > artistic > cutout
3. tentukan level 5,simplicity 5,fidelity 2
4. jadi dah seperti di iklan-iklan

membuat topeng dari muka sendiri


1. open file foto anda di photoshop
2. seleksi dengan lasso tool ( L )
3. masih di lasso tool, sekarang seleksi bagian bibir dan mata dengan menekan ALT
4. buat halaman baru dengan crtl+N
5. drag dengan ( V ) hasil seleksi ke halaman baru
6. beri effek bevel and emboss
7. dengan cara layer>layer style > bevel And emboss
8. tentukan size sesuai keinginan anda

merubah penampilan menjadi PUNK


1. seleksi bagian bibir dengan lasso tool ( L )
2. pilih menu image > udjustments > tekan variation
3. selanjutnya pilih darker dan klik beberapa kali sampai kelihatan gelap
4. batas bibir masih terlihat janggal untuk memperhalusnya dengan memilih blur
5. dengan cara pilih blur tool ( R ) dan gosokan diperbataan bibir dan kulit
6. begitu juga yang lain caranya sama

Colored pencil


cara membuat foto dijadikan seperti seolah foto itu digambar sendiri memakai pencil

1. open photoshop dan buka foto kamu
2. tekan ctrl+shift+U dan foto terlihat hitam putih
3. selanjutnya tekan menu filter>artistic>colored pencil
4. ubah pencil width 5 , stroke 10 , paper briht 35
5. selesai

Saturday, February 7, 2009

keyboard architectural text


saya akan coba membuat text dengan texture keyboard

> open Adobephotoshop
> open file gambar keyborard
> ctrl N ( new ) lebar saya isi 12cm, tinggi 5 cm dan resolusi 300 pxl/inch
( image size dipadtikan sama dengan gambar keyboard )
> tulis kalimat sesuka anda


> selanjutnya geser text dengan move tool ( V )ke gambar keybord
> seleksi text dengan magic wand tool ( W ) jangan lupa tekan shift
> hapus text dengan eraser tool ( E ) sehingga text terlihat seperti titik titik
> tekan ctrl,shift I
> pilih background pada layer

> selanjutnya hapus pada file gambar image dengan tool ( E )
> save

Candy Text


> open Adobephotoshop
> ctrl N ( new )
> dihalaman new
* widht : 10cm
* hight : 5 cm
* resolution : 300 pixel/inch
> tulis dengan text ( T )pilih warna kesukaan anda
> tekan Layer > layer style > bevel and emboss
> dihalaman layer style tentukan sizenya menjadi 15


> selesai

Black Disolve Text


> open Adobephotoshop
> tekan CTRL + N ( new )
> kali ini saya isi width:10 , hight:5 dan resolution 300 pixel/inch
> rubah background dengan paint buket tool ( G ) dengan warna hitam
> pilih text dengan font kesukaan anda, text harus berwarna hitam
> sementara text belum kelihatan karena warna text dan background sama
> pilih Layer > layer style > outer glow
> setelah muncul halaman layer style ubah
dikolom stucture
* blend mode : disolve
* opcity : 50
* noise : 0
* colour : merah

dikolom element
* technique : softer
* spread : 5
* size : 50

dikolon quality
* contour : cone - inverted
* range : 50
* jitter : 0


> OKE

menghilangkan noda jerawat

foto bisa kurang enak dilihat kalau objeknya sendiri kurang menarik, sebagai contoh kalau foto model tapi ada beberapa noda jerawat dibagian mukanya. kali ini kita akan bahas bagaimana menghilangkan noda jerawat.

> open file foto anda
> pilih clone stamp tool ( S )
> klik dibagian samping objek yang akan dihapus ( kali ini jerawat ) dengan menekan tombol ALT
> lepas lalu gosokan di bagian jerawat tersebut
> hilang pasti
catatan : pilih bagian warna kulit yang sama ketika klik dan menekan ALT

Sunday, February 1, 2009

SOFTLENS membuat mata lebih menarik

tampilan mata akan terlihat lebih menarik jika dipasang SOFTLENS
disini saya coba akan menjelaskannya dengan beberapa langkah saja


> open file photo anda
> zoom ( Z ) di area mata
> seleksi mata yang pertama dengan Polyganol Lasso Tool ( L )
> seleksi mata yang kedua dengan menekan Shift di keyboard
> setelah keduanya terseleksi dengan baik
> pilih Image > Udjustments > Variation dan pilih warna kesukaan anda
> jadi

mengubah background photo dengan photoshop

Disini kita akan merubah background foto dengan background pilihan kita dipercantik dengan layer outer glow


> open file foto anda dan file background pilihan sendiri
> seleksi foto dengan magic wand tool (W)
catatan : kalau penyeleksian tidak sempurna anda bisa menyeleksi dengan lasso (L )
> setelah sudah diseleksi hapus objek yang diseleksi dengan eraser tool ( E )
> selanjutnya dengan magic eraser tool ( masih di kolom tool ) tapi dengan cara klik kanan lalu pilih eraser tool
> setelah itu image yang di seleksi terlihat terlihat kotak-kotak
> drag image dengan move tool ( V )ke backdround pilihan kita
( image size file photo dan background harus sama )
> setelah photo sudah di drag percantik dengan layer
> caranya tekan Layer>layer style>outer glow...rubah size sesuai selera
> finish

Saturday, January 24, 2009

manipulasi foto pada karakter game dg photoshop

* open adobe photoshop

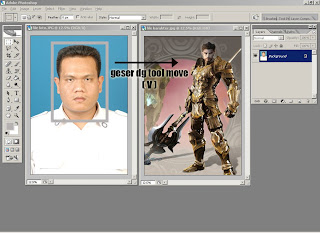
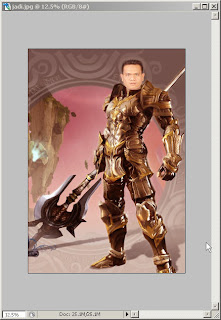
* open file photo & game characters you (the resolution of the images and characters should be the same as 300 pixels / inch)
* Selection of images with the rectangular marquee tool (M) and drag the file to the characters

* Selection of the side other than the head that are not needed some magic Wand tool (W)
or with polyganol lasso tool (L)
* Remove the Eraser tool (E)
* Adjust the size of the head, press edit> transform> scale
* Drag the head dg (V) to the characters
* Delete the part does not comply with the Eraser tool (E)
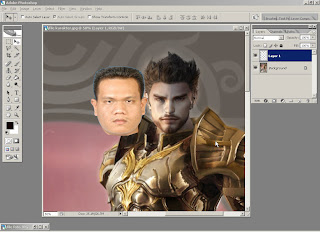
* After the head placed in the appropriate position ago save> close first
* Yag open a new file in the save (now the results are still feels awkward edit)
* We need to create an image that integrates experience
> press image> udjustments> variation, select your favorite color
* More or less a result like this

Membuat uang logam dengan Adobe Photoshop


* open Adobe Photoshop > buka File foto anda
* tekan Marquee ( M ) > klik kanan pada tool M > pilih eliptical marquee
* lingkari objek > tekan ctrl+shift+I
* hapus objek yang tidak diperlukan dg eraser tool ( E )
* masih di eraser tool > klik kanan pada tool E > pilih magic eraser tool > klik pd selain objek
* tekan ctrl+shift+U
* pilih filter > stylize > emboss
* ubahlah height dan amount sesuai dengan keinginan
* selesai

Friday, January 23, 2009

mengubah foto colour menjadi BW

caranya cukup mudah hanya dengan satu langkah

> open photoshop
> open file
> tekan : ctrl+shift+U
> simsalabim
AROSI BLOG © 2008. Design by :Yanku Templates Sponsored by: Tutorial87 Commentcute